xlsgen 3.5 build #95 : UsedRange helperBuild 3.5.0.95 of xlsgen adds support for the wellknown UsedRange helper. Traditional VBA programmers often rely on UsedRange in order to find the extent of cells in a given sheet, and use the range object capabilities to act on it, for instance deleting formulas in that range. This is exactly what xlsgen supports. For instance, worksheet.UsedRange.DeleteFormulas() is a very handy mechanism for deleting formulas in the used range of the worksheet without having to build the cell range yourself. The range object supports no less than 42 methods which means this is an effective mechanism. Just wish this was part of xlsgen long time ago already. | |
xlsgen 3.5 build #94 : Improved memory performance for XLSX filesBuild 3.5.0.94 of xlsgen improves the memory performance for XLSX files. Specifically, the writing phase is made much more scalable in memory by zipping the important parts (worksheets and shared strings) as chunks arrive rather than waiting for the whole parts to be ready for zipping. The consequence is scalability in memory for very large XLSX files. | |
xlsgen 3.5 build #93 : Fix for Mac-generated Excel filesBuild 3.5.0.93 of xlsgen adds better support for Excel files generated on Mac computers. There is an internal encoding in cells that wasn't supported and as a result could cause data loss. | |
xlsgen 3.5 build #92 : Towards great looking charts (III)In previous builds were introduced 40 Office themes and a new default theme, but there has also been work around the scenarios in which they apply : - generation of new XLS files : unaffected since there is no such thing as a theme in the XLS file format - generation of new XLSX files : theme settings stored, rendered and applied - reading of XLS files : xlsgen chart renderer enforces the classic theme (i.e. Excel 2003 theme) unless told otherwise - reading of XLSX files : xlsgen chart renderer enforces the stored theme unless told otherwise - reading of XLSB files : xlsgen extracts the theme, renders and stores it unless told otherwise - custom theme : round-tripping support, rendering support | |
xlsgen 3.5 build #91 : Towards great looking charts (II)Build 3.5.0.91 of xlsgen changes the default theme. It affects both new XLSX files (and their variants) as well as the rendering of charts by xlsgen. The default theme is now Elemental, which is one of the 40 Office themes available in xlsgen. To be more accurate, it uses Elemental for fonts and effects, but it uses the Adjacency theme colors. Indeed a theme is made of 3 independent sections : colors, fonts and effects, and a client application may choose a different theme for each section, among the 40 themes. The Elemental colors were shades of blue, and we believe it would be more appropriate to use a more diverse set of colors. That is why we choose Adjacency colors. It is equivalent to writing the following in code, except you don't have to : workbook.ThemeManager.Theme = workbooktheme_elemental; workbook.ThemeManager.CustomColors = workbooktheme_adjacency; It can be noted that this is just being the default and at any point in time in your client application, the theme can be modified by either choosing an entire theme (just one line of code), or a different theme for just colors, fonts or effects. For this there is this ThemeManager property available at the workbook level.Most notably, if you would like to keep using the theme prior this change, all you have to do is add this line of code in your program : workbook.ThemeManager.Theme = workbooktheme_modern; The chart style itself for any new chart defaults on moderate effect with auto colors, which provides great looking shadow and soft edge effects. You can also go back to what it was before : chart.Theme.EffectSpan = chartthemeeffectspan_none; chart.Theme.ColorSpan = chartthemecolorspan_auto; Below is a few charts rendered with the new default theme :  | |
xlsgen 3.5 build #90 : 40 Office themesBuild 3.5.0.90 of xlsgen adds 40 Office themes to the object model for rendering charts. So far xlsgen had 4 themes (classic, modern, olive and marine). This build introduces all 20 Office themes that are part of Excel 2007, in addition to all 20 Office themes that are part of Excel 2010. In Excel, themes can be changed by clicking on the Page layout ribbon then on the Theme drop down. Picking one immediately affects all charts and tables. In xlsgen, theme can be set by using the ThemeManager object at the workbook level. The 40 Office themes from Excel 2007 and Excel 2010 are : [helpstring("Workbook Theme, office (Excel 2007)")] workbooktheme_office = 4, [helpstring("Workbook Theme, adjacency")] workbooktheme_adjacency = 5, [helpstring("Workbook Theme, angles")] workbooktheme_angles = 6, [helpstring("Workbook Theme, apex")] workbooktheme_apex = 7, [helpstring("Workbook Theme, apothecary")] workbooktheme_apothecary = 8, [helpstring("Workbook Theme, aspect")] workbooktheme_aspect = 9, [helpstring("Workbook Theme, austin")] workbooktheme_austin = 10, [helpstring("Workbook Theme, black tie")] workbooktheme_blacktie = 11, [helpstring("Workbook Theme, civic")] workbooktheme_civic = 12, [helpstring("Workbook Theme, clarity")] workbooktheme_clarity = 13, [helpstring("Workbook Theme, composite")] workbooktheme_composite = 14, [helpstring("Workbook Theme, concourse")] workbooktheme_concourse = 15, [helpstring("Workbook Theme, couture")] workbooktheme_coutoure = 16, [helpstring("Workbook Theme, elemental")] workbooktheme_elemental = 17, [helpstring("Workbook Theme, equity")] workbooktheme_equity = 18, [helpstring("Workbook Theme, essential")] workbooktheme_essential = 19, [helpstring("Workbook Theme, executive")] workbooktheme_executive = 20, [helpstring("Workbook Theme, flow")] workbooktheme_flow = 21, [helpstring("Workbook Theme, foundry")] workbooktheme_foundry = 22, [helpstring("Workbook Theme, grid")] workbooktheme_grid = 23, [helpstring("Workbook Theme, hardcover")] workbooktheme_hardcover = 24, [helpstring("Workbook Theme, horizon")] workbooktheme_horizon = 25, [helpstring("Workbook Theme, median")] workbooktheme_median = 26, [helpstring("Workbook Theme, metro")] workbooktheme_metro = 27, [helpstring("Workbook Theme, module")] workbooktheme_module = 28, [helpstring("Workbook Theme, newsprint")] workbooktheme_newsprint = 29, [helpstring("Workbook Theme, opulent")] workbooktheme_opulent = 30, [helpstring("Workbook Theme, oriel")] workbooktheme_oriel = 31, [helpstring("Workbook Theme, origin")] workbooktheme_origin = 32, [helpstring("Workbook Theme, paper")] workbooktheme_paper = 33, [helpstring("Workbook Theme, perspective")] workbooktheme_perspective = 34, [helpstring("Workbook Theme, pushpin")] workbooktheme_pushpin = 35, [helpstring("Workbook Theme, slipstream")] workbooktheme_slipstream = 36, [helpstring("Workbook Theme, solstice")] workbooktheme_solstice = 37, [helpstring("Workbook Theme, technic")] workbooktheme_technic = 38, [helpstring("Workbook Theme, thatch")] workbooktheme_thatch = 39, [helpstring("Workbook Theme, trek")] workbooktheme_trek = 40, [helpstring("Workbook Theme, urban")] workbooktheme_urban = 41, [helpstring("Workbook Theme, verve")] workbooktheme_verve = 42, [helpstring("Workbook Theme, waveform")] workbooktheme_waveform = 43 As a consequence of a number of those themes bringing along with them picture parts used for textures, xlsgen.dll is now 400 KB bigger in size. Both the 32-bit and the 64-bit versions. | |
xlsgen 3.5 build #89 : Towards great looking chartsBuild 3.5.0.89 of xlsgen refines a feature meant to create great looking charts. This is the first build and it will be followed by more of it. In build 3.5.0.61, xlsgen added support for 48 chart styles for use when creating/updating XLSX files (and their variants). These are wonderful chart styles one can pick among 48 for any chart type, but as it turns out, it is harder than usual to pick which one would be good to use because this is just a list of unspecified 48 chart styles. At least, according to the way Excel stores this information inside files. xlsgen tries to make things more palatable for users out there. This is why we are refining this by sorting out the 48 chart styles according to what they can be used for. Here are the 48 chart styles,  There are 6 rows of 8 styles, thus 48 styles. The 48 styles are spread around two axis, vertically the effect span, horizontally the color span. Each row thus has 8 color variants : the grayscale, the automatic colors, and then 6 primary theme color selections. There are 6 rows accounting for 4 gradual effect spans : no effect, subtle effect, moderate effect, intense effect, and then two more rows for the classic Excel 2003 mode and the intense dark mode (dark background which may be white depending on your system background and foreground colors). How it works in xlsgen is quite simple. Here is a piece of code in C++ for a creating a pie chart with, as in the example above, the moderate effect, and auto colors : chart001s0->Theme->EffectSpan = xlsgen::chartthemeeffectspan_moderate; chart001s0->Theme->ColorSpan = xlsgen::chartthemecolorspan_auto; Here are two examples of such chart styles :  A pie chart made with moderate effect and auto colors 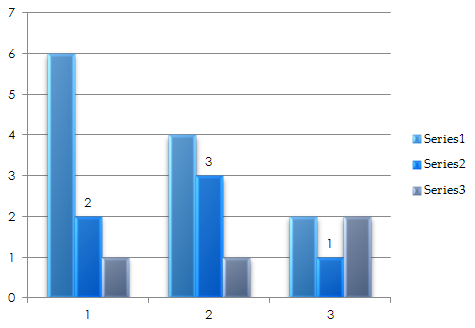 A bar chart made with moderate effect and auto colors Charts look professional. | |
xlsgen 3.5 build #88 : Reduced same-sheet referencesBuild 3.5.0.88 of xlsgen adds read, write and calc support for reduced same-sheet references. Reduced same-sheet references are formulas of the form =!$C$5, that is a cell or area reference without a sheet name before the exclamation point. Excel allows the use of such formulas in defined names. What they allow is to create indirections with less constraint than fully qualified cell or area references. xlsgen brings full support for it. | |
xlsgen 3.5 build #87 : Import Excel XLSB files (III)Build 3.5.0.87 adds more features from XLSB files. The features provided in this build are in bold below. Imported features from XLSB files are :
| |
xlsgen 3.5 build #86 : Import Excel XLSB files (II)Build 3.5.0.86 adds support for more features from XLSB files and is a continuation from what was introduced in build 3.5.0.84. The features are in bold below. Imported features from XLSB files are :
Last but not least, the automatic source code generator that is part of the xlsgen install can also open XLSB files. | |
xlsgen 3.5 build #85 : Alternate filename associationsBuild 3.5.0.85 of xlsgen makes it possible to define alternate filename associations for reading or writing files using xlsgen. It works like this. If you have a file ending with .aaa and you know this file is an Excel 2007 file, you can use the following in order to make sure that xlsgen will open it correctly : engine.Workbooks.AddFilenameAssociation("aaa", xlsgen::excelversion_2007); and then, workbook = engine.Open("inputfile.aaa", "outputfile.xlsx"); This works with New(), Open() and other methods where an Excel filepath is passed. | |
xlsgen 3.5 build #84 : Import Excel XLSB filesBuild 3.5.0.84 adds support for importing Excel XLSB files. XLSB files were introduced along with XLSX/XLSM/XLST/XLSA files a few years ago. XLSB files are binary files and have nothing to do with XLS files. xlsgen imports many of the features in XLSX files. Among them : - cells - formatting - formulas - charts - text boxes and vector shapes - pictures - defined names - conditional formattings - page setup - VBA macros To use this feature, just pass a XLSB file (or XLSB memory buffer) to the Open() method. | |
xlsgen 3.5 build #83 : Automatically opening encrypted XLS filesBuild 3.5.0.83 of xlsgen continues the work begun with build 3.5.0.82 in which we added support for automatically decrypting XLSX files (and their variants) without a password. This was useful for cases where Excel would encrypt a file depending on what you are doing with it. xlsgen adds support for XLS files (and their variants) in such scenario. So when you are to open such file, you do not have to pass a password. | |
xlsgen 3.5 build #82 : Automatically opening encrypted XLSX filesBuild 3.5.0.82 of xlsgen makes it possible that some auto-encrypted XLSX files can be auto-opened with xlsgen without the hassles of passing a password. Auto-encryption occurs in Excel depending on the version of Excel being used, and obviously the action triggering this encryption. The action in question is the "Protect workbook" feature that you can find in the Review ribbon tab. When this button is clicked, Excel will provide the ability to check/uncheck "Structures" and "Windows", thereby giving you the ability to ask Excel to lock the ability to add/move/delete sheet tabs and the ability to move windows hosting the sheet tabs, respectively. Usually this is enforced by passing a password. As it turns out, if you are using Excel 2003 (or past versions) or Excel 2007, the file will be encrypted after you used this "Protect workbook" feature. It won't if you are using Excel 2010 or Excel 2013 however, but it does not matter to you. And, as it turns out too, this encryption uses a hardcoded password, not the password mentioned above. This hardcoded password can be found over on the internet by just using the correct keywords in Google. Without knowledge of this password, xlsgen could not in the past open such files. Beginning with this build xlsgen automatically tries to open a file (or an input buffer in memory) as an encrypted file with said password. If the file isn't encrypted, xlsgen knows it soon in the code execution so there is no performance loss compared to what we did before. The benefits is that xlsgen can now automatically open those files. This behavior does not prevent the regular password file encryption/decryption from working correctly. | |
xlsgen 3.5 build #81 : Increased password lengthBuild 3.5.0.81 of xlsgen makes it possible to use more complex passwords when securing spreadsheets. As it turns out, with XLSX files and their variants Excel 2007 upgraded the password length limit from 15 characters to 255. Beginning with this build, xlsgen reflects that. So for any XLS, XLA, XLT, XLM file, the password length limit is still 15 characters for encrypting or decrypting a spreadsheet. And for any XLSX, XLSA, XLST, XLSM file, the password length limit is 255 characters. | |
xlsgen 3.5 build #80 : Faster merged cellsBuild 3.5.0.80 of xlsgen improves the speed at which merged cells in bulk can be processed. There are two improvements. During the insertion in sheets, the hit test is made much faster (hit test must occur to avoid creating overlapping merged cells otherwise Excel thinks the file is corrupt). And during the writing phase in XLSX files, merged cells are written much faster. Think an order of magnitude in both. | |
xlsgen 3.5 build #79 : Strong-named .NET assemblyBuild 3.5.0.79 of xlsgen includes the interop .NET assembly (Interop.xlsgen.dll) strong-named from now on. You can find it in the samples folder. What is strong-named for? What this allows is install this .NET assembly in the global assembly cache should the need arise. For instance we have been using it lately for use in Sql Server Integration Services scenarios. Custom SSIS packages make use of custom .NET assemblies provided they can be found arbitrarily on the system, and that's when the global assembly cache comes into play. Just for reference, if you would like to install Interop.xlsgen.dll in the global assembly cache, all you have to do is bring a command line window and type : gacutil.exe /i <xlsgen install path>\Interop.xlsgen.dll The interop assembly is the same whether you are using the 32-bit or the 64-bit version of xlsgen.dll. The reason is that an interop assembly, by definition, is just MSIL, not target code. | |
Sample : SSIS package for each loop container and exporting to PDF filesOne simple thing that xlsgen can do in your Sql Server Integration Services (SSIS) package is convert files. In the SSIS package we are creating, we iterate over a folder of arbitrary Excel files and convert them as PDF files. This SSIS package could be part of a larger package where, after PDF files are created, they are sent by email to a list of known recipients. - Start SQL Server Business Intelligence development studio. - Select File / New / Project, pick Integration Services Project and click OK. 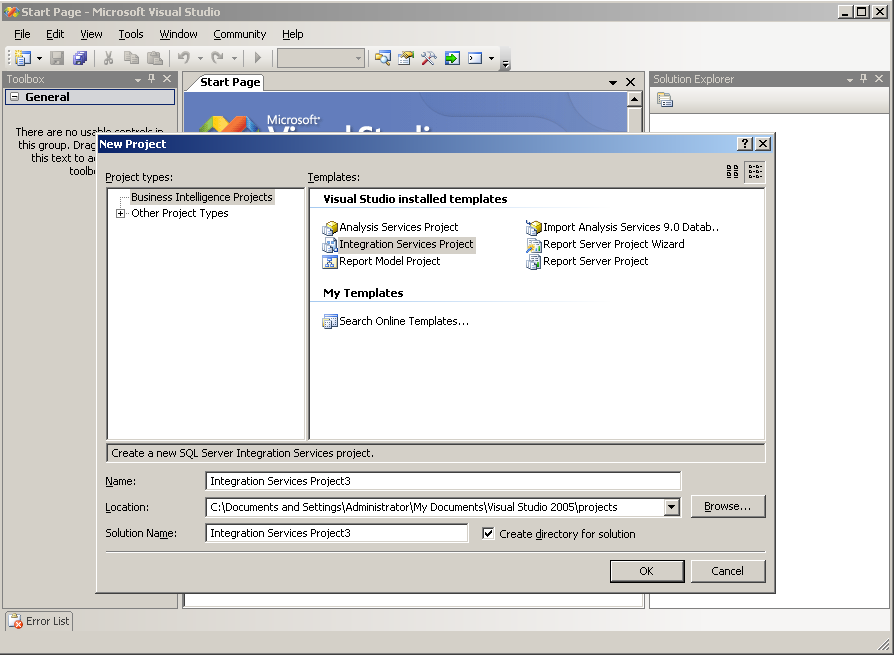 - From the Toolbox, drag and drop the Foreach Loop Container item onto the main work surface :  What the Foreach Loop Container does for us is allow to iterate over a collection of objects, from files or from a database, then pass each such object name down to a data flow object for transformation purposes. What we need to do then is to configure the Foreach Loop Container, actually define the root filepath where our Excel files are stored. - In the C:\temp folder, we have a bunch of Excel files standing there :  - Double-click on the Foreach Loop Container, click on the Collection tab on the left and make sure that in front of the Enumerator drop down, it reads Foreach File Enumerator, which means this container will enumerate files in a folder (and sub-folders) that is going to be set right away. - Click on the Browse button and navigate towards C:\temp and click OK. Back in the Foreach Loop Container dialog, edit the Files edit box so that it filters out anything other than *.xls files :  - Before we are done, we must associate a variable for passing the object identifier, in this case an Excel filepath, so it can be passed to tasks and components for processing. Click on the Variable mappings tab on the left, then even though it is not obvious, click on the white cell below the Variable header so that a drop down appears and lets you select New Variable....  - Click on it and then the Add Variable dialog appears. Make sure the Name of the variable is ExcelFilepaths and click OK.  - The variable name User::ExcelFilepaths appears in the list of variables. Click OK.  - The rest of the setup is a matter of creating a new Script Task and making sure that this script task creates an instance of xlsgen and then uses the User::ExcelFilepaths variable to obtain the current Excel file being processed and then exporting to a PDF file in the C:\temp folder. So in a nutshell, drag and drop a Script Task item from the Toolbox into the Foreach Loop Container : 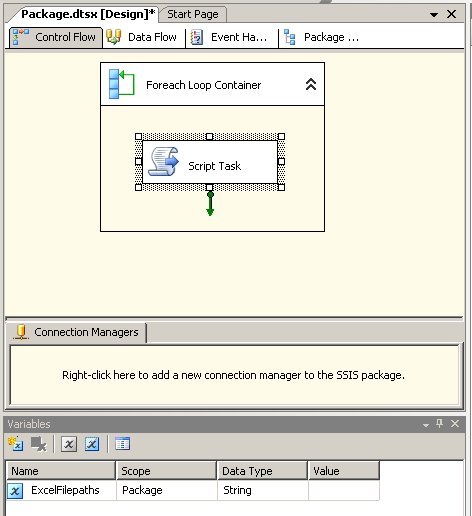 - Double-click on the Script task being selected. In the Script Task Editor dialog, click on the Script tab on the left, then edit the ReadOnlyVariables box so that our Excel::UserFilepaths is referred to :  - Click on the Design Script... button to enter the script editor and then replace the template source code with the following :
- Before you quit the script editor, we must let SSIS know of xlsgen as a component. Right-click on References on the left and choose Add Reference.... - In the Add Reference dialog, click on Interop.xlsgen, click on the Add button and click OK. If you don't see Interop.xlsgen in the list of .NET assemblies, read our Setup. - As you do this, all compile errors originating from xlsgen being unknown as a component are resolved, click on File / Save and then quit the script editor. - Click OK which gets you back to the main SQL Server window. - We are now ready to run. Just click on Debug / Start without debugging. The items become yellow and then green when the package execution is complete :  - Just open-up the C:\temp folder, and the PDF files are there if all went well :  | |||
Sample : scheduling a SQL Server Integration Services job- Start the SQL Server Management Studio - Expand the SQL Server Agent folder on the left, right-click on Jobs and choose New Job.  - In the New Job dialog, give a Name to the job : 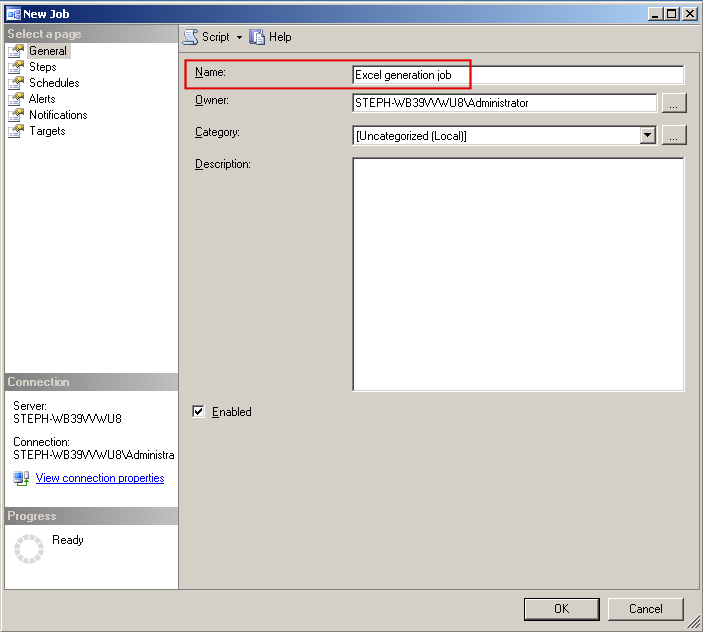 - Click on the Steps page from the list on the left. Then click on the New button to create a new step :  - In the New Job Step dialog, give a name to the step, then choose the SQL Server Integration Services Package Package-type from the Type drop-down :  - In the General tab, select File System from the Package source drop-down : (this is a simple case, packages may also come from the SSIS catalog) 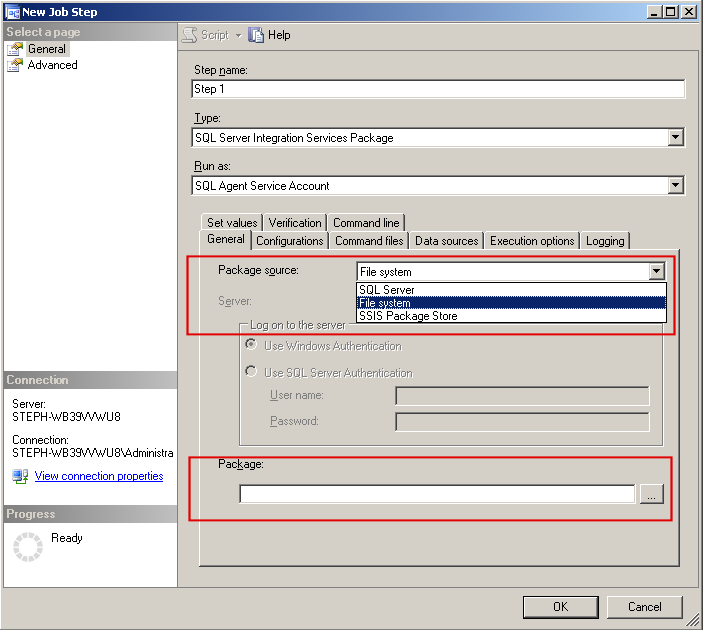 - As the Package field at the bottom gets enabled, click on the [...] button and browse the file system for finding Package.dtsx :  - Click OK to quit the New Job Step dialog. - If you would like to test the running of this job right away, you can click OK again to quit the New Job dialog. In SQL Server Management Studio, the new job is listed :  - If however you are willing to schedule the running of this job, in the New Job dialog, click on the Schedules item and click on New in order to create a new schedule (or select one of the existing schedules if any) :  - In the following we are create a schedule such that the job will run every 5 minutes. Enter a name for the schedule in the Name field. In the Occurs dropdown, choose Daily. Click on Occurs every, enter 5 in the field next to it and choose minutes in the dropdown. Click OK to quit the dialog :  - Click OK to end the New Job dialog and return to the main SQL Server Management Studio dialog. - After 5 minutes, the first run occurs automatically. You can view the outcome by right-clicking on the job item and choosing View history. 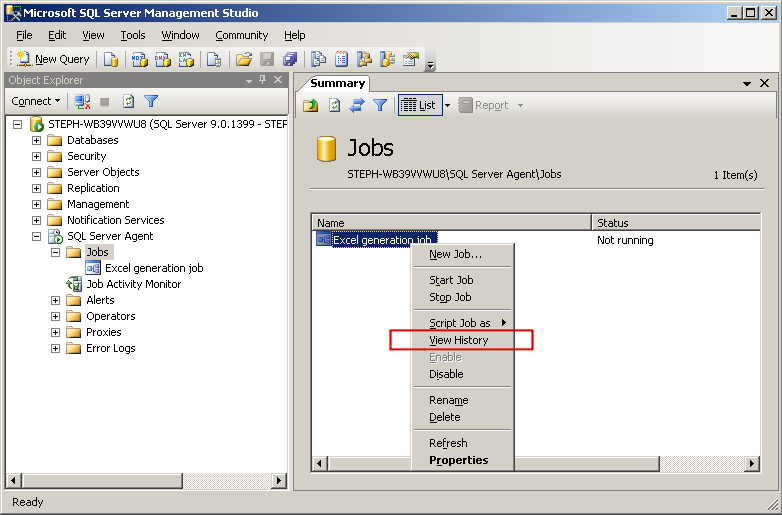 - At any moment, you may run the job by right-clicking on the job item and choosing Start Job. - The View history action lets you see previous job runs and act upon them :  This concludes a simple job scheduling and barely scratches the surface of what can be done by introducing query-based parameters and so on, for instance you could schedule the packaging and delivering of Excel files to individuals whose names and email addresses are known from a SQL query statement. | |
Sample : using SQL Server Integration Services- Start SQL Server Business Intelligence development studio. - Select File / New / Project, pick Integration Services Project and click OK. 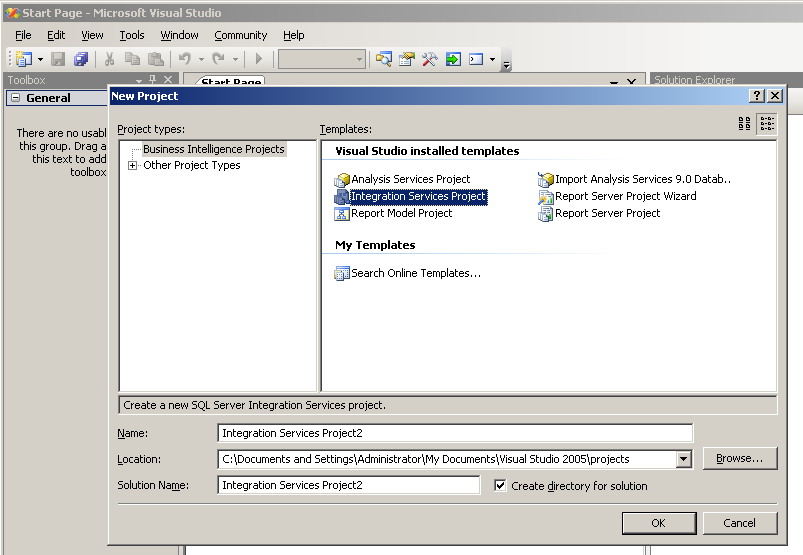 - The project is created and the Business Intelligence development studio shows up : 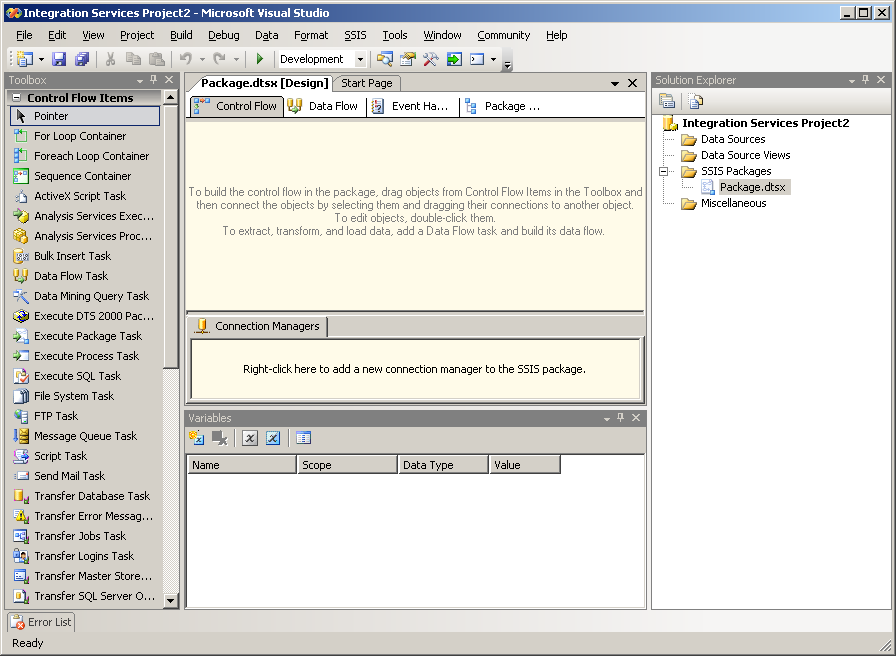 - If you don't see the Variables window, click on SSIS in the menu bar and choose Variables. This will be used later on. - The project creates a file called a SSIS package, which is a file with a DTSX suffix. SSIS packages are designed, built, run, debugged and scheduled. Scheduling occurs in the SQL Server Management Studio. Everything else occurs right within the Business Intelligence development studio. - Drag and drop the Script Task item from the Toolbox window onto the Package main surface area. 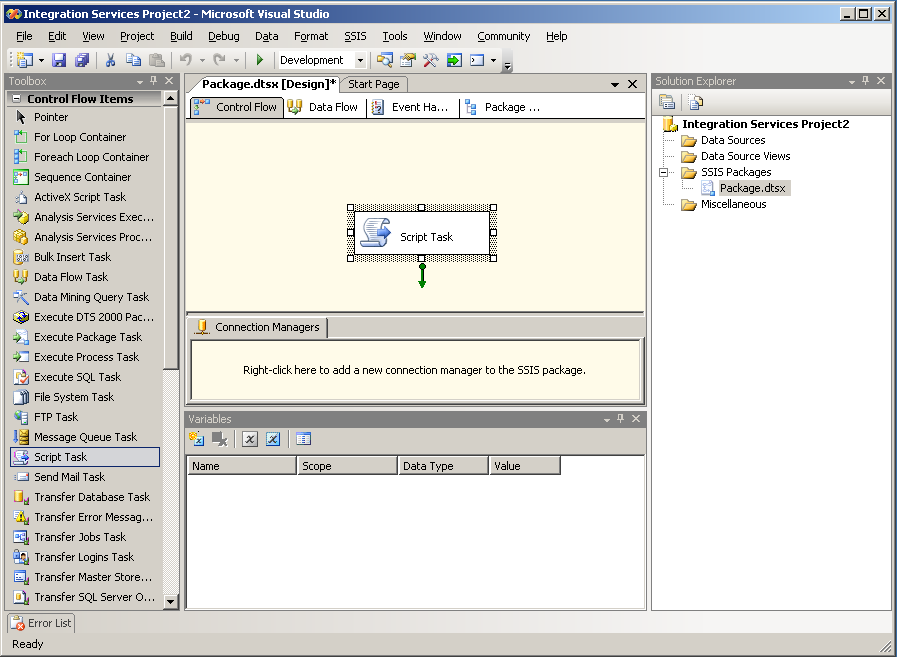 - Click elsewhere in the Package main surface area so that the Script Task object is unselected. - In the Variables window, click the Add Variable icon in order to create a Variable. Name it ExcelFilepath. Note that spaces are not allowed. Change the Data Type value with the dropdown so it becomes a String. Enter c:\Temp\test.xls in the Value column. As expected, this variable will let know the Script Task where to store the Excel file that xlsgen is going to create.  - Start a Windows explorer instance and make sure the C:\Temp folder exists. - Back to the SQL Server Business Intelligence development studio, double-click on the Script Task object in order to edit it. - The Script Task Editor dialog shows up : 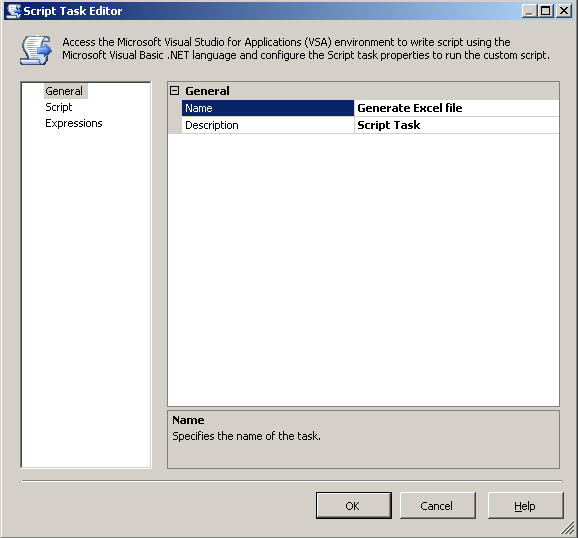 - Edit the Name so it becomes Generate Excel file. - Then click on the Script tab on the left 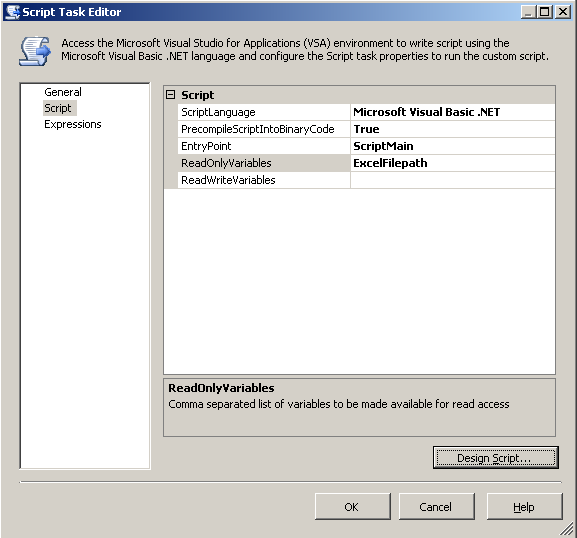 - Click on the ReadOnlyVariables field and enter ExcelFilepath, which is the name of the Variable that was created earlier. We are telling the environment the names of the variables we are going to refer to in the script. - Click on the Design Script button in order to start the actual source code editor. 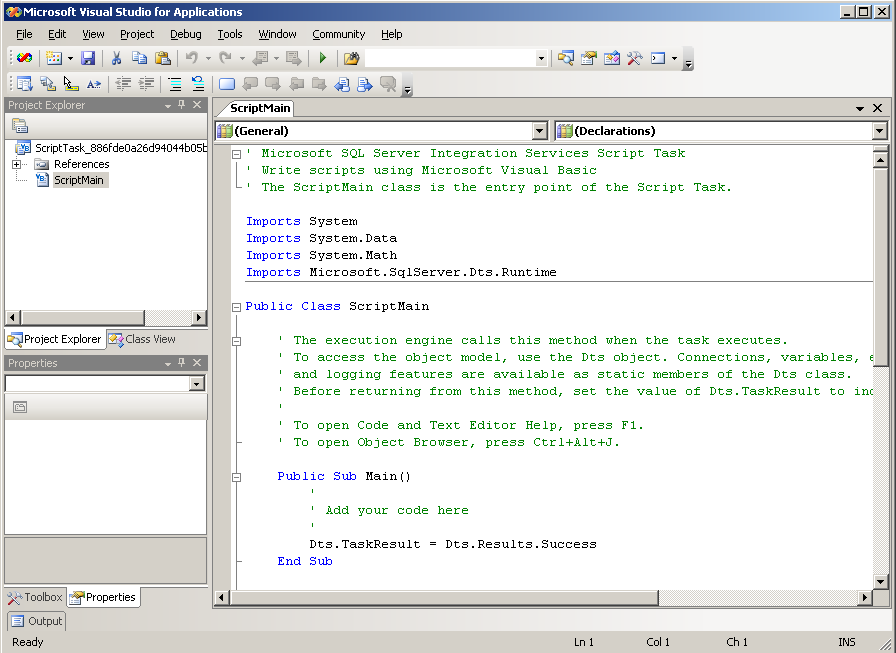 - The source code editor window is filled with a template source code that we are going to edit in order to work with xlsgen. But before we do that, we must let know that we are going to use xlsgen by adding it as a .NET reference. So right-click on References in the Project Explorer window on the left and choose Add Reference. 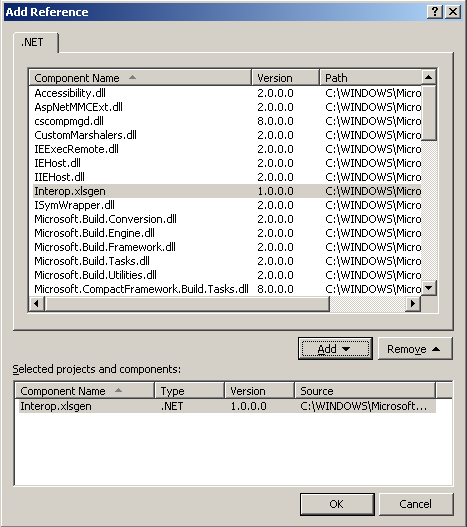 - When you do this, the .NET assemblies dialog shows up and lists the known .NET assemblies. If you can't see Interop.xlsgen in there, you must follow the steps to Setup xlsgen for use in SSIS. And because SSIS caches the list of known .NET assemblies, you must also quit SSIS and start it again once the setup is done. - Click on Interop.xlsgen, then on the Add button and click OK. - Interop.xlsgen appears in the References tree in the Project Explorer window. - Select the whole existing source code in the source code window, and replace it with the following :
- This source code creates a trivial Excel file. Notice the use of the ExcelFilepath variable that we created earlier. - Hit Ctrl+S in order to save the source code. - At this point, if any part of the source code is underlined, it is because it is a compile error. This must be fixed before going any further. - Then from the menu bar, click on Debug / Build. This does nothing visually. - Quit the source code editor. Click OK to quit the Script Task Editor dialog. - Hit Ctrl+S in order to save the package on the hard drive (or the SSIS catalog). - Our package is now ready to run. From the menu bar, click on Debug / Start Debugging, or just click on the green triangle in the main toolbar. 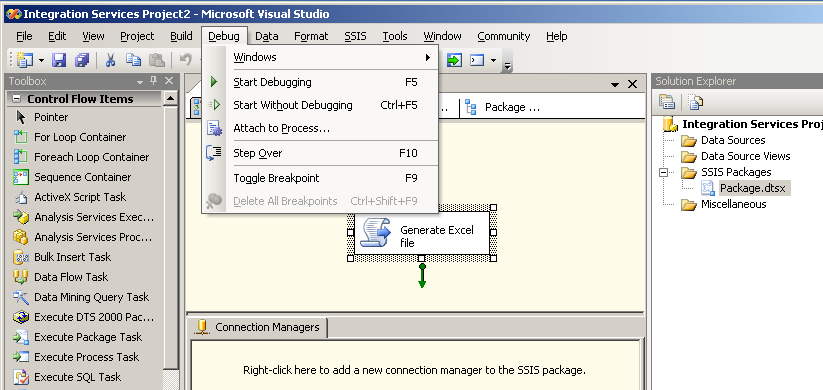 - The Script Task should become yellow when the package is running. And then, depending on the outcome, it will become either red, which means there is an error somewhere, and an exception dialog will show up, or it becomes green, which means the package successfully run. 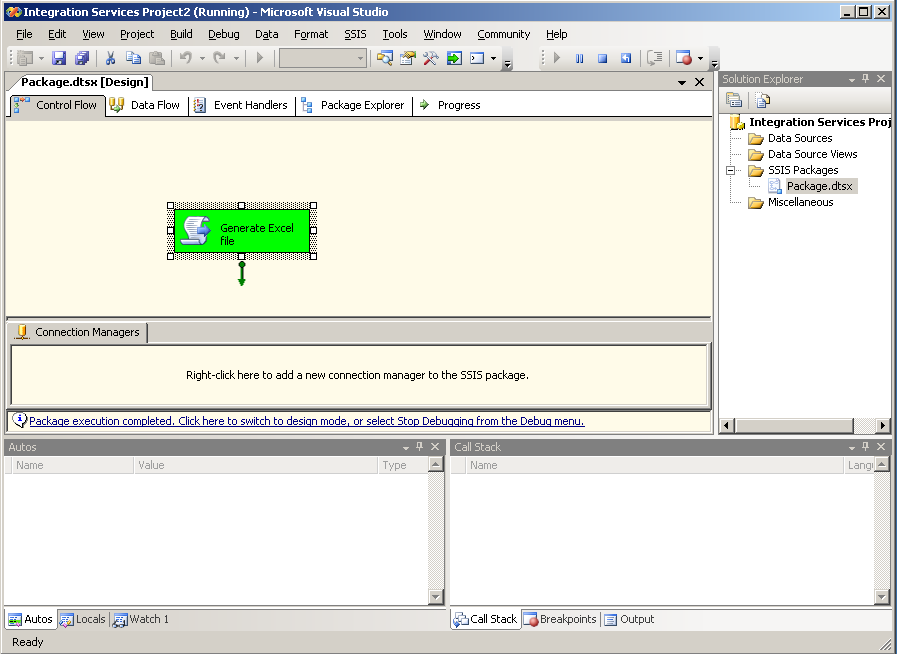 - Regardless how the execution went well or not, you are still in debugging mode and can end it whenever you want by using the menu bar and choosing Debug / Stop debugging. - If the Script Task was green during execution, you can open up a Windows explorer window and verify that the Excel file exists in the C:\Temp folder. - The SSIS package is ready. - You can now create a SQL Agent job from the SQL Server management studio, where this package will be referred to, and schedule it. | |||