| xlsgen > overview > Rows and Columns |
Rows and Columns is an object abstraction over cells. It allows for better quicker cell manipulation by handling whole rows and whole columns. Once you have defined a set of rows or columns to work with, the following features are available :
The rows are programmable using the IXlsWorksheetRows interface available from the worksheet Rows collection. By analogy, columns are programmable using the IXlsWorksheetColumns interface available from the worksheet Columns collection
Rows and Columns objects are accessible from a worksheet. You must define a range using either the RxxCxx:RyyCyy notation or the Ax:Bx notation. From a programming perspective, the RxxCxx:RyyCyy notation is the easiest to use. Alternatively, range conversion helpers let you switch from one notation to the other. See below for a sample code.
Setting the width and height is possible on a per column and on a per row basis. It's been exposed in the worksheet object for a while already (ColWidth, RowHeight, MultipleColWidth, MultipleRowHeight). With the Rows and Columns objects, it's possible to do the same for a whole range of rows and columns at once, and more consistently. Units are different whether we are talking columns or rows. For columns, it's a number of times a nominal character of size 8 points (rule of thumb : take a width in pixels, divide by 8). We have introduced a WidthInPixels property in IXlsWorksheetColumns in order to work directly with pixels. For row heights, it's pixels.
| VB code |
Dim engine As CoXlsEngine
Set engine = CreateObject("ExcelGenerator.ARsTDesign")

Dim wbk As IXlsWorkbook
Set wbk = engine.Open("c:\input\MyExistingFile.xls", "c:\output\ResultingFile.xls")

Dim wksht As IXlsWorksheet
Set wksht = wbk.WorksheetByIndex(1)

' change the height of rows 2, 3, 4, and 5
'   set it to 40 pixels
wksht.Rows("2:5").Height = 40

wbk.Close

Set engine = Nothing
|
| C# code |
xlsgen.CoXlsEngine excel = new xlsgen.CoXlsEngine();

IXlsWorkbook wbk = excel.Open( @"c:\input\MyExistingFile.xls", @"c:\output\ResultingFile.xls" );

IXlsWorksheet wksht = wbk.get_WorksheetByIndex(1);

// change the height of rows 2, 3, 4, and 5
//  set it to 40 pixels
wksht.get_Rows("2:5").Height = 40;

wbk.Close();
excel = null;
|
| C/C++ code |
{
  xlsgen::IXlsEnginePtr engine( __uuidof(xlsgen::CoXlsEngine) );

  xlsgen::IXlsWorkbookPtr wbk;
  wbk = engine->Open(L"c:\\input\\MyExistingFile.xls", L"c:\\output\\ResultingFile.xls" );

  xlsgen::IXlsWorksheetPtr wksht = wbk->WorksheetByIndex[1];

  // change the height of rows 2, 3, 4, and 5
  //  set it to 40 pixels
  wksht->Rows[L"2:5"]->Height = 40;

  wbk->Close();
}
|
Please note that if you'd like to set the default height for all rows of the worksheet, or the default width for all columns of the worksheet, there are two methods for that available in the worksheet object (DefaultColWidth, DefaultRowHeight).
Instead of numerically setting widths and heights, you can simply let xlsgen compute them for you. What's done is that when comes the time to commit the content of the worksheet in the output Excel file, xlsgen determines each row and column flagged as Autofit, then it proceeds by measuring and computing the extent of text in both directions. The resulting widths and heights are the minimum required to contain the content of cells without seeing them appear truncated in Excel. This is an intensive computation so use it wisely.
| VB code |
Dim engine As CoXlsEngine
Set engine = CreateObject("ExcelGenerator.ARsTDesign")

Dim wbk As IXlsWorkbook
Set wbk = engine.Open("c:\input\MyExistingFile.xls", "c:\output\ResultingFile.xls")

Dim wksht As IXlsWorksheet
Set wksht = wbk.WorksheetByIndex(1)

' set height autofit rows 2, 3, 4, and 5
wksht.Rows("2:5").AutoFit = True;

wbk.Close

Set engine = Nothing
|
| C# code |
xlsgen.CoXlsEngine excel = new xlsgen.CoXlsEngine();

IXlsWorkbook wbk = excel.Open( @"c:\input\MyExistingFile.xls", @"c:\output\ResultingFile.xls" );

IXlsWorksheet wksht = wbk.get_WorksheetByIndex(1);

// set height autofit rows 2, 3, 4, and 5
wksht.get_Rows("2:5").AutoFit = 1;

wbk.Close();
excel = null;
|
| C/C++ code |
{
  xlsgen::IXlsEnginePtr engine( __uuidof(xlsgen::CoXlsEngine) );

  xlsgen::IXlsWorkbookPtr wbk;
  wbk = engine->Open(L"c:\\input\\MyExistingFile.xls", L"c:\\output\\ResultingFile.xls" );

  xlsgen::IXlsWorksheetPtr wksht = wbk->WorksheetByIndex[1];

  // set height autofit rows 2, 3, 4, and 5
  wksht->Rows[L"2:5"]->AutoFit = TRUE;

  wbk->Close();
}
|
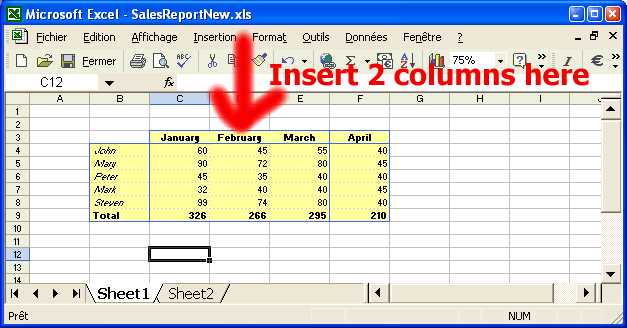
The new row/column objects allow to insert an arbitrary number of rows or columns right in the middle of nowhere. It may look like a non-issue, but it actually is since in a matrix the only way to insert rows or columns is by moving other cells away, and since some cells overlap other cells, this turn out to be stitching art. Below are two screenshots of an example, and then the accompanying code :

| VB code |
Dim engine As CoXlsEngine
Set engine = CreateObject("ExcelGenerator.ARsTDesign")

Dim wbk As IXlsWorkbook
Set wbk = engine.Open("c:\input\MyExistingFile.xls", "c:\output\ResultingFile.xls")

Dim wksht As IXlsWorksheet
Set wksht = wbk.WorksheetByIndex(1)

' insert two columns at column D
wksht.Columns("D:D").Insert(2)

wbk.Close

Set engine = Nothing
|
| C# code |
xlsgen.CoXlsEngine excel = new xlsgen.CoXlsEngine();

IXlsWorkbook wbk = excel.Open( @"c:\input\MyExistingFile.xls", @"c:\output\ResultingFile.xls" );

IXlsWorksheet wksht = wbk.get_WorksheetByIndex(1);

// insert two columns at column D
wksht.get_Columns("D:D").Insert(2);

wbk.Close();
excel = null;
|
| C/C++ code |
{
  xlsgen::IXlsEnginePtr engine( __uuidof(xlsgen::CoXlsEngine) );

  xlsgen::IXlsWorkbookPtr wbk;
  wbk = engine->Open(L"c:\\input\\MyExistingFile.xls", L"c:\\output\\ResultingFile.xls" );

  xlsgen::IXlsWorksheetPtr wksht = wbk->WorksheetByIndex[1];

  // insert two columns at column D
  wksht->Columns[L"D:D"]->Insert(2);

  wbk->Close();
}
|
Deletion is the opposite of Insertion. Rows or columns are really deleted from the worksheet, not blanked out or hidden. In the sample code below, we alternatively delete two rows, and two columns.
You can notice the effect of deletion on merged cells : merged cells are reduced accordingly, and possibly deleted altogether depending on which rows or columns are deleted.


| VB code |
Dim engine As CoXlsEngine
Set engine = CreateObject("ExcelGenerator.ARsTDesign")

Dim wbk As IXlsWorkbook
Set wbk = engine.Open("c:\input\MyExistingFile.xls", "c:\output\ResultingFile.xls")

Dim wksht As IXlsWorksheet
Set wksht = wbk.WorksheetByIndex(1)

' delete two rows (5 and 6)
wksht.Rows("5:6").Delete

' delete two columns (C and D)
wksht.Columns("C:D").Delete

wbk.Close

Set engine = Nothing
|
| C# code |
xlsgen.CoXlsEngine excel = new xlsgen.CoXlsEngine();

IXlsWorkbook wbk = excel.Open( @"c:\input\MyExistingFile.xls", @"c:\output\ResultingFile.xls" );

IXlsWorksheet wksht = wbk.get_WorksheetByIndex(1);

// delete two rows (5 and 6)
wksht.get_Rows("5:6").Delete();

// delete two columns (C and D)
wksht.get_Columns("C:D").Delete();

wbk.Close();
excel = null;
|
| C/C++ code |
{
  xlsgen::IXlsEnginePtr engine( __uuidof(xlsgen::CoXlsEngine) );

  xlsgen::IXlsWorkbookPtr wbk;
  wbk = engine->Open(L"c:\\input\\MyExistingFile.xls", L"c:\\output\\ResultingFile.xls" );

  xlsgen::IXlsWorksheetPtr wksht = wbk->WorksheetByIndex[1];

  // delete two rows (5 and 6)
  wksht->Rows[L"5:6"]->Delete();

  // delete two columns (C and D)
  wksht->Columns[L"C:D"]->Delete();

  wbk->Close();
}
|
Extent computation is a way to name the idea that starting from a given cell in a worksheet, you can choose one of the directions (up, down, left, right) and ask yourself whether this new cell is empty or not, and then iterate through the process until you reach an empty cell. That's right, computing the extent of ranges is meant to compute the dimensions of a fictitious range of cells which share a common attribute : non-emptiness.
To make the object model easy to grok, new properties have been added to the Rows and Columns objects exposed by xlsgen. If you are looking into computing the extent in the vertical direction, you should definitely find the appropriate property in the Columns object. Likewise, look for the Rows object to compute the extent in the horizontal direction.

And here is the code to do just that :
| VB code |
Dim engine As CoXlsEngine
Set engine = CreateObject("ExcelGenerator.ARsTDesign")

Dim wbk As IXlsWorkbook
Set wbk = engine.Open("c:\input\MyExistingFile.xls", "c:\output\ResultingFile.xls")

Dim wksht As IXlsWorksheet
Set wksht = wbk.WorksheetByIndex(1)

' compute the horizontal extent to the left, on row 7
'   starting from cell F7. 6 = column F
Dim left
left = wksht.Rows("A7:F7").LeftExtent(6)
' it should return left = 2

' compute the vertical extent to the top, on column F
'   starting from cell F7. 7 = row 7
Dim top
top = wksht.Columns("F1:F7").TopExtent(7)
' it should return top = 3

wbk.Close

Set engine = Nothing
|
| C# code |
xlsgen.CoXlsEngine excel = new xlsgen.CoXlsEngine();

IXlsWorkbook wbk = excel.Open( @"c:\input\MyExistingFile.xls", @"c:\output\ResultingFile.xls" );

IXlsWorksheet wksht = wbk.get_WorksheetByIndex(1);

// compute the horizontal extent to the left, on row 7
//   starting from cell F7. 6 = column F
int left = wksht.get_Rows("A7:F7").get_LeftExtent(6);
// it should return left = 2

// compute the vertical extent to the top, on column F
//   starting from cell F7. 7 = row 7
int top = wksht.get_Columns("F1:F7").get_TopExtent(7);
// it should return top = 3

wbk.Close();
excel = null;
|
| C/C++ code |
{
  xlsgen::IXlsEnginePtr engine( __uuidof(xlsgen::CoXlsEngine) );

  xlsgen::IXlsWorkbookPtr wbk;
  wbk = engine->Open(L"c:\\input\\MyExistingFile.xls", L"c:\\output\\ResultingFile.xls" );

  xlsgen::IXlsWorksheetPtr wksht = wbk->WorksheetByIndex[1];

  // compute the horizontal extent to the left, on row 7
  //   starting from cell F7. 6 = column F
  int left = wksht->Rows[L"A7:F7"]->LeftExtent[6];
  // it should return left = 2

  // compute the vertical extent to the top, on column F
  //   starting from cell F7. 7 = row 7
  int top = wksht->Columns[L"F1:F7"]->TopExtent[7];
  // it should return top = 3

  wbk->Close();
}
|
xlsgen documentation. © ARsT Design all rights reserved.